This page contains a tutorial on how to run a first simulation with BHAC. We hope to add more tutorials with time. For more information the user is advised to read the full documentation.
Tutorials
Getting started
Getting the code
Note: Unfortunately BHAC does not run on Windows. In case you are using a Windows machine, you can still play with the code by setting up a virtual machine. Please follow the steps here: https://docs.google.com/document/d/1RZxIFZogpx6BDUvSSi8g_oUUhW6AvGpq9fCj7weasFk/edit?usp=sharing
We will install the code to the ~/codes/bhac directory. To download the code, the following commands should do the trick:
cd ~mkdir codescd codes
Using git:git clone https://gitlab.itp.uni-frankfurt.de/BHAC-release/bhac.git
cd bhac
Downloading a compressed folder:
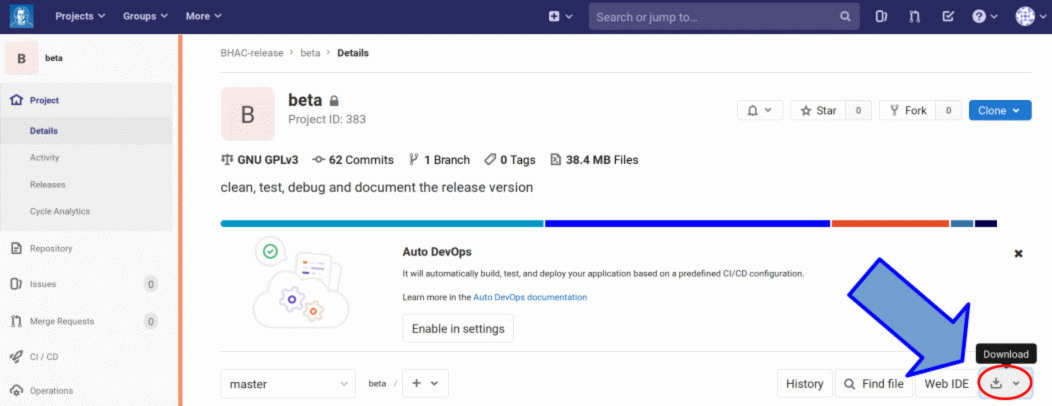
It is also possible to download a compressed folder with the most recent BHAC version in your preferred format. To do this, access the BHAC repository with your web browser and click where indicated by the arrow in the following image

and then uncompress as usual.
Installation
The only thing that should be done after unpacking is to provide the $BHAC_DIR environment variable holding the path to the code. For bash, this can be done by typing:
echo 'export BHAC_DIR=$HOME/codes/bhac' >> ~/.bashrc
Or manually adding the following entry to the ~/.bashrc (or ~/.bash_profile) file:
# BHAC:export BHAC_DIR=$HOME/codes/bhac
To use scripts more conveniently, the following line in ~/.bash_profile is recommended although not essential: PATH="$BHAC_DIR:$BHAC_DIR/tools:./:$PATH"
Don’t forget to source the .bashrc (.bash_profile)
source ~/.bashrc
or
source ~/.bash_profile
Running a test problem
To run the code, a good practice is to create a new directory outside $BHAC_DIR. We can get started with the (one dimensional) shock tube, located at $BHAC_DIR/tests/rmhd/shockTube. We will create a directory bhac_runs in the home directory, and copy the problem set-up.
mkdir ~/bhac_runs cd ~/bhac_runs cp -r $BHAC_DIR/tests/rmhd/shockTube ./ cd shockTube
In this folder, you can type
$BHAC_DIR/setup.pl -d=13 -phi=3 -z=2 -g=12 -p=rmhd -eos=gamma -nf=0 -arch=gfortran -coord=cart
which sets up a 1D grid with three vector components (-d=13) for (general) relativistic MHD (-p=rmhd) in Cartesian coordinates (-coord=cart). For more information, see README.md in the same directory.
For completeness, the remaining flags in the setup-line mean:-g=12 sets the number of cells in each AMR-block, including ghost-cells, to 12. This number can change for each dimension, e.g. in 3D you might write -g=20,12,12. See Data structures for more information. -nf=0 defines zero advected tracers. -phi=3 -z=2 sets the order of the vector components, it is only relevant for spherical or cylindrical grids. See Axial symmetry for more information.
You will notice some *.t files in your directory. These are:
amrvacsettings.tamrvacusr.tamrvacusrpar.t
You only have to care about the last two. In amrvacusr.t, the whole problem for example initial conditions and boudary conditions are set up and amrvacusrpar.t can be used to provide additional global varibles for your setup.
The machine specific definitions are outsourced to the directory $BHAC_DIR/arch. There you have a number of pre-defined make rules for various compilers. If you are using Intel, you should well be served with default.defs. To tell BHAC to use these definitions, type
$BHAC_DIR/setup.pl -arch=default
If using instead gfortran, the make rules are written in gfortran.defs and can be set using
$BHAC_DIR/setup.pl -arch=gfortran
Note on gfortran version >10: gcc made the questionable decision to mark perfectly normal usage of MPI calls as erroneous and will not compile unless told to merely put out a warning. This is the case for you if you get errors like this one:
/home/oliver/code/bhac-dev/tests/rmhd/FMtorus/F90sources/slice.f90:608:38:

  608 |          call MPI_FILE_WRITE(slice_fh,subsizes(2-1),1,MPI_INTEGER,status,&
      |                                      1
......
  714 |          call MPI_FILE_WRITE(file_handle,tree%node%leaf,1,MPI_LOGICAL, status,&
      |                                         2
Error: Type mismatch between actual argument at (1) and actual argument at (2) (INTEGER(4)/LOGICAL(4)).
Thus if you use more recent versions of gfortran, you will need to set it up with the modified definitions:$BHAC_DIR/setup.pl -arch=gfortran10
Now it is time to
make
and upon successful compilation, create an output directory
mkdir output
To run the code, type
mpiexec -n 4 ./bhac -i amrvac1D.par >output/out
This will run BHAC on four cores of your machine using the pre-defined parameter-file amrvac1D.par (-i) and redirect the standard output to the file output/out. This should take around 15 seconds. Several new files will appear inside the directory ‘output’, ending in .dat, .vtu and one file called amrvac.log – this is the log file updated during computation. The .dat files are used for restarts (for more information, see Command line parameters) and the .vtu files contain the output data to be visualized with e.g. Paraview (we also provide Python interfaces though). For more information on the available output formats, see File formats.
Congratulations, you have run your first simulation with BHAC!
Introductory tutorials
Here you can find a series of tutorials taken from a course given by Héctor Olivares at the Universidad Autónoma de San Luis Potosí (UASLP), in English and Spanish. These aim to guide the user from installing the code to running a turbulent accretion simulation, and cover the usage of the BHAC Python tools.
Full documentation
The full documentation is available here.
Reporting bugs
If BHAC behaves in a way different than expected and you believe this might be due to a bug, please get in touch with one of the developers. It is possible that the bug has already been found by another user and we are already working on it. In this case it will appear in the list of known issues.
